Project Design
Brief Key Architectural Drivers
The Why
For figuring out what we needed for our architecture, we first needed to know how this game was going to be played, accessed and used. With this in mind, our game is a singleplayer game with no real need to access any outside information other than your saves and the game data. This would allow us to use a more secluded architecture that could be downloaded and work independently from any other systems.
We would need the game to be able to respond to updates in the system. This includes entering new areas, inventory systems, saved data, NPC interaction, and the combat system. Our code is currently based on classes. This means that every component is coded separately but they are also able to easily interact with each other. An example of this is our collidable class and NPCs/Player classes. These classes are able to interact to centralize reusable code.
Blackboard Architecture
The How
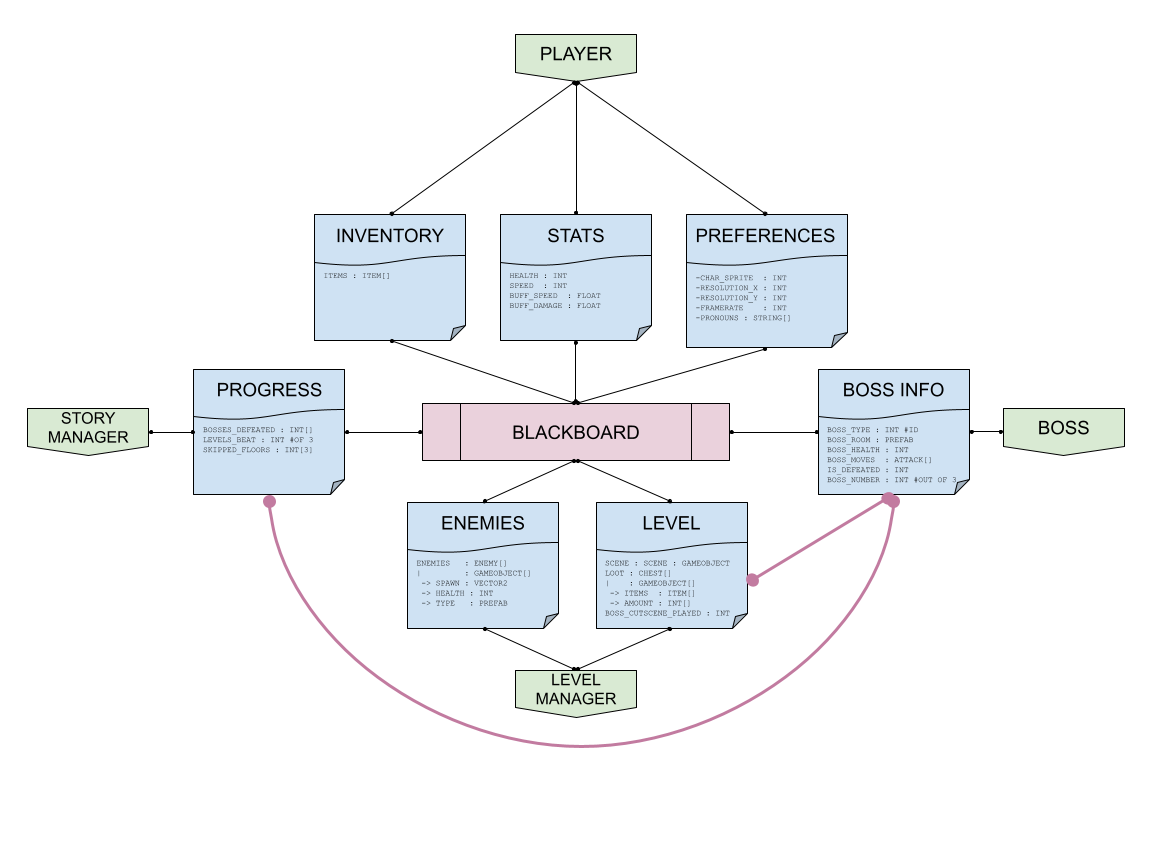
This architecture helps in quick read and write access for all elements within the game with a singleton instance, our “BlackBoard,” called the GameManager.
Key important pieces to our game’s architecture, such as the Player framework, Story Manager, Boss Framework, and Level Manager, all need access to each other’s data and states. Rather than importing each and creating and linking multiple different references to each new item that we need - I.E. in Player, make a reference to Story Manager, Level Manager, and Boss - even if we might need it for only one miniscule piece in our code, we can make one link to the Blackboard, and a link back.
By making a link to the BlackBoard to access its components, and a link referencing back to the original piece (Player, Story, Level, Boss), and doing the same for every single class that needs to access others, we can have a two-way pipeline that allows for only one reference being needed.
Gone are five different references; one holds them all. This also helps if later in our design we split the Story Manager into different pieces rather than just one piece, or if we develop cutscenes, we can set the “inCutscene” flag to true, and any key items that only work when not in a cutscene will automatically be informed of it instead of having to reference yet another class specifically for cutscenes.
Risks
We do acknowledge the risks of singleton classes, especially syncronization issues. If we have any classes or updates that need to be made to our singleton Game Manager, we will need to create specific locks (blocks) to prevent any changes to specific items that could be overwritten by other classes that also write to the blackboard in order to keep everything syncronized, and there is no possibility for a segmentation fault, invalid data access, or corruption. For example, if the game is being saved during a quicksave or full save, we want to lock all changes incoming, which could be done by setting a “lock” flag to true, and all setters need to have an additional check for a lock and hold the change in a queue.
Examples
Certain interactions need access from other pieces in our framework. For example, in the purple highlight, Level needs the information on which boss is needed, which then gives the Boss Manager the necessary level information to give a random boss for the current level. Once the boss is generated and returned, possibly with a generateBoss(current_level) function, the level can then generate the appropriate room and spawns, then save its data into the Blackboard. The purple lines are “pseudo” lines, and show an example relationship, but all of this occurs through the “middleman” which is the Blackboard.
Pronouns are another good example. Via player preference, we can set the pronouns that the player wishes to be referred to in-game by NPCs, the narrator, or any other necessary text menu or popup, which can be in a variety of different classes that need access to that preference. By centralizing it within the BlackBoard, each class that needs access to it can simply call the C# getter (which is just the capital version of the property) for Subjective, Objective, and Possessive, whenever a pronoun is needed. The boss could be referring to the player, or the story manager could be displaying a series of text menus or cutscene dialogues, or an NPC could be referring to the player via pronouns. All player preferences live in the Blackboard.
Singleton Blackboard
Meet: The GameManager
The GameManager.cs file is the file that tends to work as a hub for the rest of the files. Examples of this currently are the Awake, ShowText, the prononouns, SaveState, and LoadState methods which is used once the game starts.
- Awake Method
- The awake method is used once the game has been launched and is used to create a screen resolution, create an instance of GameManager, loads the load state if there is any, and creates an object to not destroy.
- Pronouns
- These pronouns are going to be used for player preference. This is part of our customizability that will let the player work with their preferences in game.
- Subjective/Objective/Possesive Methods
- This method will return the type of pronoun from the lists created to be used in text labels later on throughout the story.
- ShowText Method
- This method is called to be able to show a floating text in the game. If we want something to pop up when there is an interaction, such as walking into a chest or talking to an npc, this method will be called to show the text on the screen for a chosen amount of time with specific font size, color, position, and motion.
- SaveState method
- This method will load the current save state of the game and set it.
- LoadState method
- Checks if there is a current savestate and will load that save state into the game if there currently is one, otherwise will do nothing.
We also create certain objects for use later in other methods as well. Examples of these are the:
- Player object
- FloatingTextManager object
- PlayerSprites
- WeaponSprites
- itemDataBase
Game Objects and Scripts
These are scripts attached to objects that extend from the MonoBehavior class. The scripts enact certain actions and functionality for objects such as the player and NPCs.
Movement (Movement.cs)
This class handles all movement behavior, which includes collision and water movement debuffs. This helps centralize all behavior, and allows for easy modification to movement mechanics and addition to new debuffs or buffs such as in-water movement.
- These following properties are available to customize
moveMultiplier: Movement speed for the object.0.5Fis the default.waterResistance: Movement speedmultiplierwhen the object is in water.1.0Fis the default.- Anything
less than 1.0Fslows the object movement down. - Anything
greater than 1.0Fspeeds the object movement up. No debuffis applied if the value isexactly 1.0F.
- Anything
Player (Player.cs)
This script controls the entirety of a player GameObject, and is the main driver for the player-controlled character. It extends Movement.cs to have a unified movement behavior, and receives all of the Movement class’s fields.
- Player has a reference to their own Inventory Manager (
InventoryManager.cs) as a field for easy access. - Player overrides parent (base)
Start(), callsbase.Start(), then sets thecurrentHealthandcurrentThirsttomaxHealthandmaxThirst, and sets it to the respective visual bars. -
FixedUpdate()takes user input and calls its parent’s,Movement,MoveDirectionmethod that takes in avector2of its x and y movement based on user input. -
Implementation of
HealthBar.cs-
TakeDamage - arguments: int damage - subtracts from the current health by the damage input. This will then call the SetHealth function from
HealthBar.csto update the health bar object. -
HealthRegen - arguments: void - checks first if currentHealth is lower than maxHealth, if so, updates a time to include deltaTime, this ensures that the health is not regenerated every frame, but at a set time. The next comparison chech if the time is greater than or equal to ThirstHealthDebuff() and update the Plauyer’s currentHealth and resets the timer.
-
Update - arguments: void - this is called once per frame. This includes some testing for taking damage and calls HealthRegen().
-
-
Implementation of
ThirstBar.cs-
BecomeThirst - arguments: int thirst - validates input, then will subtract from the Player’s current thirst by thirst input. This will then call the SetThirst function from
ThirstBar.csto update the thirst bar object. -
RecoverThirst - arguments: int thirst - validates input, then will add to the Player’s current thirst with the input thirst. This will then call the SetThirst function from
ThirstBar.csto update the thirst bar object. -
ThirstHealthDebuff - arguments: void - this will return a float to work with the HealthRegen function. Based on currentThirst, this will return a float increasing by 5% for each 25% decrease of the Player’s currentThirst.
-
Update - arguments: void - this is called once per frame. This includes some testing for taking damage. Calls BecomeThirst() after an appropriate key press and RecoverThirst() after an appropriate key press.
-
Health Bar (HealthBar.cs)
This sets up the health bar system for the player object. This extends MonoBehaivor.
- This features two functions that set integers realating to the Player’s health.
- Respectively, this will then effect the slider object attached to the player.
(See Player.cs for implementation of these scripts)
Thirst Bar (Thirstbar.cs)
Similar to the health bar, this will set the thirst bar system for the Player. This extends MonoBehaivor.
- This features two functions that set floats relating to the Player’s thirst.
- Respectively, this will then effect a seperate slider object attached to the player.
(See Player.cs for implementation of these scripts)
Camera Motor (CameraMotor.cs)
The Camera Motor is the main driver for the primary player camera, which extends Movement.cs in order to have all the unified movement behavior and properties as any other entity that requires it.
- There is an extra field,
lookAt, which can be set to any GameObject to tail. - Additionally,
boundXandboundYdefine how far the object in focus needs to move before the camera begins to follow along. - The
Start()method overrides theBaseStart()method inMovement.cs. It still calls the baseStart()withBase.Start(), then overrides the defaultblockingMasksthat will halt movement; I.E. the gameObject masks to collide with. - The Camera Motor also comes equipped with a “Panic” system in case the Camera gets stuck around a sharp turn or tight squeeze in collision objects, that takes two fields:
panicDistance: The distance thelookAtobject needs to get away from the camera before disabling collisions.panicEnd: Control field to detail the end of the panic (panicStart+2 seconds). If the panic is enabled, thenpanicEndwill be the time in which collisions will be re-enabled and dictate the end of the panic.
Item Database (ItemDatabase.cs)
Item database is a singleton that stores all instances of unique items to be quickly referenced and copied into the player’s inventory.
- All Item instances are declared upon
Awake()to allow for quick retrieval when in-game.- Currently implemented via a list; Dictionary<int, Item> will be implemented next sprint.
- GetItem() fetches an item from the database via ID or Name.
GameManagernow holds a reference to the ItemDatabase GameObject to quickly reference wherever needed to forego a costly fetch.
Lerp (AutoLerp.cs)
This is a simple script to allow for an item’s color property to cycle through a given list of colors at a given interval of time.
- It has the following customizable fields:
active: Defines whether or not to Lerp.specialColors: Defines the colors to cycle through; takes UnityColorstatics.colorTransitionTime: The amount of seconds to smoothly transition between colors inspecialColors.
Player Inventory (InventoryManager.cs)
InventoryManager stores all items that the player has in a list, along with keeping track of the weight.
- It contains a reference back to ItemDatabase for quick access.
GameManagernow holds a reference to the InventoryManager GameObject to quickly reference wherever needed to forego a costly fetch.
UML DIAGRAM
InventoryManager {
public
------
ItemCount(Item item | int id | string name) : int
GiveItem(Item item | int id | string name) : bool
RemoveItem(Item item | int id | string name) : bool
CanCarry(Item item) : bool
}
- GiveItem() checks weight against the current haul, and returns true if it was able to add to the player’s inventory, and increments current weight based on the item weight.
- RemoveItem() returns true if it found and removed an item from the inventory, and decrements the current weight based on the item weight.
- CanCarry() is a helper function to see if an item’s weight is able to be carried based on the current weight being carried.
Floating Text Manager (FloatingTextManger.cs)
Floating Text manager is meant to drive forward the floating text.
- Update Method
- This method is meant to work as a refresh to the text and make sure that it runs the amount of time needed and doesn’t stay longer than needs to be. Calls the method
UpdateFloatingTextinFloatingText.csto make sure this happens correctly.
- This method is meant to work as a refresh to the text and make sure that it runs the amount of time needed and doesn’t stay longer than needs to be. Calls the method
- GetFloatingText Method
- This method will check to see if there is currently a text active if not, it will retrieve a text, instantiate it, and send it back to the
Showmethod.
- This method will check to see if there is currently a text active if not, it will retrieve a text, instantiate it, and send it back to the
- Show Method
- Show will set all fields of a floatingText object. This includes the actual text (
msg),fontSize,color,position,motion, andduration. This will finally call the show method in theFloatingText.csfile.
- Show will set all fields of a floatingText object. This includes the actual text (
Collidable (Collidable.cs)
This class is a base behavior script that collects all collisions that make contact with the attached gameObject. It then calls OnCollide() with up to 10 objects colliding with it at once, which can be overriden to allow for child classes to define their own behavior based on the incoming collision.
- Private Fields
hits: An array that stores up to 10 collided gameObjects.messageShown: If aPlayerobject collides with this gameObject, and emits a message, it will remaintrueuntil thePlayerstops colliding, that way there’s no duplicate looping messages and it only shows once while colliding.
FixedUpdate(): Called 50 times per second, and collects all the colliding objects.OnCollide(): Default behavior that can be overriden; IfmessageShownorcollisionis not aPlayer, then return, elsemessageShowngets turned totrue.
Collectable (Collectable.cs)
This class extends Collidable.cs, and has a reference to the ItemDatabase singleton, which gets retrieved from the GameManager on Start(). This is the base behavior class for any object that has a collectable item in it.
OnCollide: Filters so thatPlayeris the only one to collect an item.OnCollect: Setscollectedflag to true so that all collection behavior ceases.
Pickup (Pickup.cs)
This class extends Collectable.cs, and has two important fields.
- This field is mandatory, and dictates what kind of item the gameObject is supposed to be:
itemId: The item represented will be of this defineditemIdfrom theitemDatabase.
-
itemInstanceholds the item that is retrieved from the database onStart()so that it may give it to thePlayerlater when they interact. OnCollide()is overriden.- It first checks to see if the item has not been
collected, and if the collision comes from aPlayer. - If the
Player, based on their Inventory, is able to carry theitemInstance, then it will callOnCollect()to add the currentItemto their inventory, then delete the gameObject to remove it from the scene as it has been collected, then inform the player. - If it is unable to be carried as it exceeds the
Player’s carry weight, then it will inform the player that it cannot carry the item due to thePlayercarrying too much.
- It first checks to see if the item has not been
Chest (Chest.cs)
This class extends Collectable.cs and implements behavior for chest gameObjects.
- The following customizable fields are available:
emptychest: The Sprite to display when the chest is empty/collected.locked: Iftrue, the chest can only be unlocked with a specific key (unlockKeyId).itemsHeldIds: List ofItemids that will be held inside the chest. These are initialized and retrieved from the database onStart()in order to give to the player later if unlocked.unlockKeyId: The specificItemID to retrieve from theItemDatabaseto set as theItemneeded to unlock this specific chest. By default it isItemID (0), a Silver Key.tooltipShown: This is aprivatevariable that dictates whether or not the “I need a key for this” prompt has been shown. It is similar to the behavior ofmessageShown, but specific to the hint to find a key for it.
-
HasKey(): Checks to see if the player (fromGameManager) has at least 1 of the required key based on theunlockKeyIdwhich is initialized tounlockKeyItemReference. OnCollide(): Overriden to only check for aPlayercollision, and only proceed if collected.- If the chest is not locked, it will call
OnCollect(). - If the player interacts with the chest, and uses
Fire3, the primary interact key, it means they wish to unlock the chest.- If the player
HasKey(), then it will remove the key from their inventory and stop the method from going forward. - If the player
!HasKey(), then it will notify the player they do not have the required key and stop the method from going forward.
- If the player
- If the player did not interact with the chest, it will reset
tooltipShown, then it will notify them that it is locked if the message has not been shown already and if the chest is locked.
- If the chest is not locked, it will call
OnCollect(): Overriden to give thePlayerall the items contained inside.- It will disable the “locked” collider, which makes the chest collidable while it is locked, so that it can now be walked through since there’s no lock on it anymore.
- If the chest holds no items (
itemsHeld.Count < 1), then it will notify the player that there are no items with a random message, then return out of the method. - Since now we know there are items, it will reward the player with all the items and add them all to their inventory with
InventoryManager.GiveItem(item), which is grabbed from theGameManager’s instance of thePlayer, and then the reference to theInventoryManagerfrom thatPlayerreference. It also displays the name of the item as it pops out of the chest and is given to the player.
NPC (NPC.cs)
This is the main driver class for any NCP and centralization for its behavior. It extends Movement.cs as it implements the need for movement based on whether or not it is following something.
- The following customizable fields are available:
target: The target of this NPC. This is what will be focused on and followed.focusing: This defines whether or not the NPC “looks” at itstarget; it moves the sprite’s position based on this.limitedRange: If set totrue, the NPC will only follow if thetargetis within a specifiedrange.range: The range, or “reach”, the NPC has if range is limited; its follow zone.maxHealth: Max NPC health.health: Current NPC health.standingStill: Iftrue, it will not follow its designatedtarget.facingBackward: The sprite to use if thetargetgoes above the current NPC’s position, to mimic it turning its back away from the camera to follow thetarget“up” the level. If not set, the default is the current sprite so it does not disappear.
FixedUpdate(): Checks to see if the NPC isfocusingand updates the location faced accordingly, then takes the range and direction from thetarget, and if it haslimitedRange, then it will make sure thetargetis in range. Finally, it will call its parent function,MoveDirection(), with aVector2of the direction of thetarget.
Story NPC (StoryNPC.cs)
This is the starting framework for any NPC that is not an enemy (though, it extends NPC.cs, just with extra functionality); rather, they are there to speak to the player and are interactable. This is still yet to be implemented, but it will have specific dialogue prompts to display based on the GameManager and its story progression field.
Warp Gate (WarpGate.cs)
This is a simple implementation to allow for two warp gates to be inter-connected and teleport a Player to its pair.
There is no need to re-define the WarpGate link as it is pre-defined with its partner in the Pre-fab.
It automatically fetches the Main Camera to teleport it immediately instead of having it trail.
- The following customizable fields are available:
outLeft: Incoming gets spawned left of the current gate.outRight: Incoming gets spawned right of the current gate.outDown: Incoming gets spawned down of the current gate.outUp: Incoming gets spawned up of the current gate.
Static Classes
These classes do not extend Unity’s MonoBehavior class, and are used in conjuction with scripts that do. These are helpers to encapsulate key data points such as Items and their information.
Item (Item.cs)
This is a Static class for all in-game items.
- Items can have an ID, name, description, weight, an icon for the inventory, and any extra stats that might come in handy for later development stages.
- These items are disconnected from Unity’s MonoBehavior library and are addons to an item that uses the
Pickup.csscript, or are located within any objects that are Collectables (Colletable.cs). - Item icons are stored in the following directory relative from root AND ARE TO BE NAMED EXACTLY AS THE ITEM IS NAMED IN-GAME:
/Sprites/Items
Convention example:
-----------------------
Directory: /Sprites/Items/Blue Key.imageExtension
Item instance: {
name: "Blue Key"
}
This is due to the Item class constructor using the itemName property to fetch and Reload the icon for later use in the project.
UML DIAGRAM
Item {
public
------
Constructor(
	id : int,
	weight : int,
	name : string,
	description : string,
	stats : dictionary<string, int>
) : Item
Constructor(Item item) : Item
itemId     : int
itemName   : string
itemDescription : string
itemWeight : int
itemIcon   : Sprite
stats      : Dictionary<string, int>
}
Floating Text (FloatingText.cs)
This file is meant to hold the very basics for showing, hiding, and updating the text currently on screen. This file also holds all the fields of floatingText.
- Fields:
boolactive.- Shows whether a text is currently active or not.
GameObjectgo- Works to update the text in unity through GameManager
Texttxt- This is the actual text that will show up in game.
Vector3motion- This is how we want the text to move in game. This includes the text sliding up, down, left or right.
floatduration- How long we want the text to show up on screen.
floatlastShown- When the text was last on screen.
- Show Method
- Will set the
activefield to true, set thelastShownfield to the time in the engine that is current, and call to set the text to active.
- Will set the
- Hide Method
- Will set the
activefield to false, and call to set the text as inactive.
- Will set the
- UpdateFloatingText
- Will check the
activefield first and check if it is inactive, will return if so. Will then make sure that thelastShownfield is not greater than the wanted duration of the text. Finally will update the motion of the text, or more specifically the current position of the text.
- Will check the